VMware ESXi Host Upgrade

In September 2022, a critical project was undertaken to upgrade four VMware ESXi hosts from version 6.7 to the latest 7.0 release. These hosts played a pivotal role in our virtualization infrastructure, and the upgrade was essential to stay current with new features, security enhancements, and performance improvements. This blog post will take you through the meticulous process of planning and executing the upgrade successfully. This project was completed on an air-gapped network.
Project Overview
Servers Involved
Four ESXi hosts required upgrading to VMware ESXi 7.0:
We need to replace the boot drive in Server1-Server3. These servers previously had 2GB USB-DOM boot drives that needed to be updated to new 200GB SSD’s. Below are the steps that were taken.
The plan for these servers are to [backup the ESXi config], [remove the USB-DOM boot drive], [insert the SSD], [install VMware ESXi, 6.7.0, 14320388 via a CD/DVD], [confirm connectivity], [restore the ESXi config], then [update to VMware ESXi, 7.0.3, 19193900.]
vSphere Server 1
- Initial Version: VMware ESXi 6.7.0, 14320388
- Upgrade Completed: 09/09/22
vSphere Server 2
- Initial Version: VMware ESXi 6.7.0, 14320388
- Upgrade Completed: 09/16/22
vSphere Server 3
- Initial Version: VMware ESXi 6.7.0, 14320388
- Upgrade Completed: 09/23/22
==========================================================================
We needed to replace the boot drive in Server4. This server had a 4GB USB-DOM boot drive that needed to be updated to a new 200GB SSD. This servers boot drive was already configured with vSphere 7.0.3. Although this 4GB USB-DOM is sufficient for vSphere 7.x, it will be obsolete and not allowed in vSphere 8.x. This boot drive upgrade was only nececessary to keep all of the servers uniform.
The plan for this one is to [backup the ESXi config], [remove the USB-DOM boot drive], [insert the SSD], [install VMware ESXi, 7.0.3, 19193900 via a CD/DVD], then [restore the ESXi config].
vSphere Server 4
- Initial Version: VMware ESXi 7.0.3, 19193900
- Upgrade Completed: 09/23/22
The Upgrade Process
Backup the ESXi configuration
Before initiating the upgrade process, thorough preparation was essential. This included:
- Creating full backups of all ESXi configurations.
# SSH into the ESXi host and sync the configuration
vim-cmd hostsvc/firmware/sync_config

# Back up ESXi configuration
vim-cmd hostsvc/firmware/backup_config
- As a result, you’ll receive a link to download the configBundle.tgz archive file from the ESXi host. You should replace the asterisk with the IP address of your ESXi host. The archive file that contains the ESXi configuration backup is saved to the /scratch/downloads directory for a short period of time (a few minutes). o Navigate to http://IPADDRESS/downloads/**.tgz via a web browser and download the configBundle.tgz file to your local machines ~Downloads folder.
THIS WAS COMPLETED ON ALL FOUR (4) ESXi HOSTS
Upgrading to VMware ESXi 7.0
Server1, Server2, and Server3 (Boot Drive Replacement and vSphere Upgrade):
- Download the VMware ESXi 6.7 NEC Custom Image for
VMware ESXi 6.7 U3 Install CD.- Click on Products and Accounts/My Products
- Click on All Products tab; select View Download Components next to VMware vSphere;
- Select Version 6.7 from the dropdown menu
- Click on Custom ISOs tab
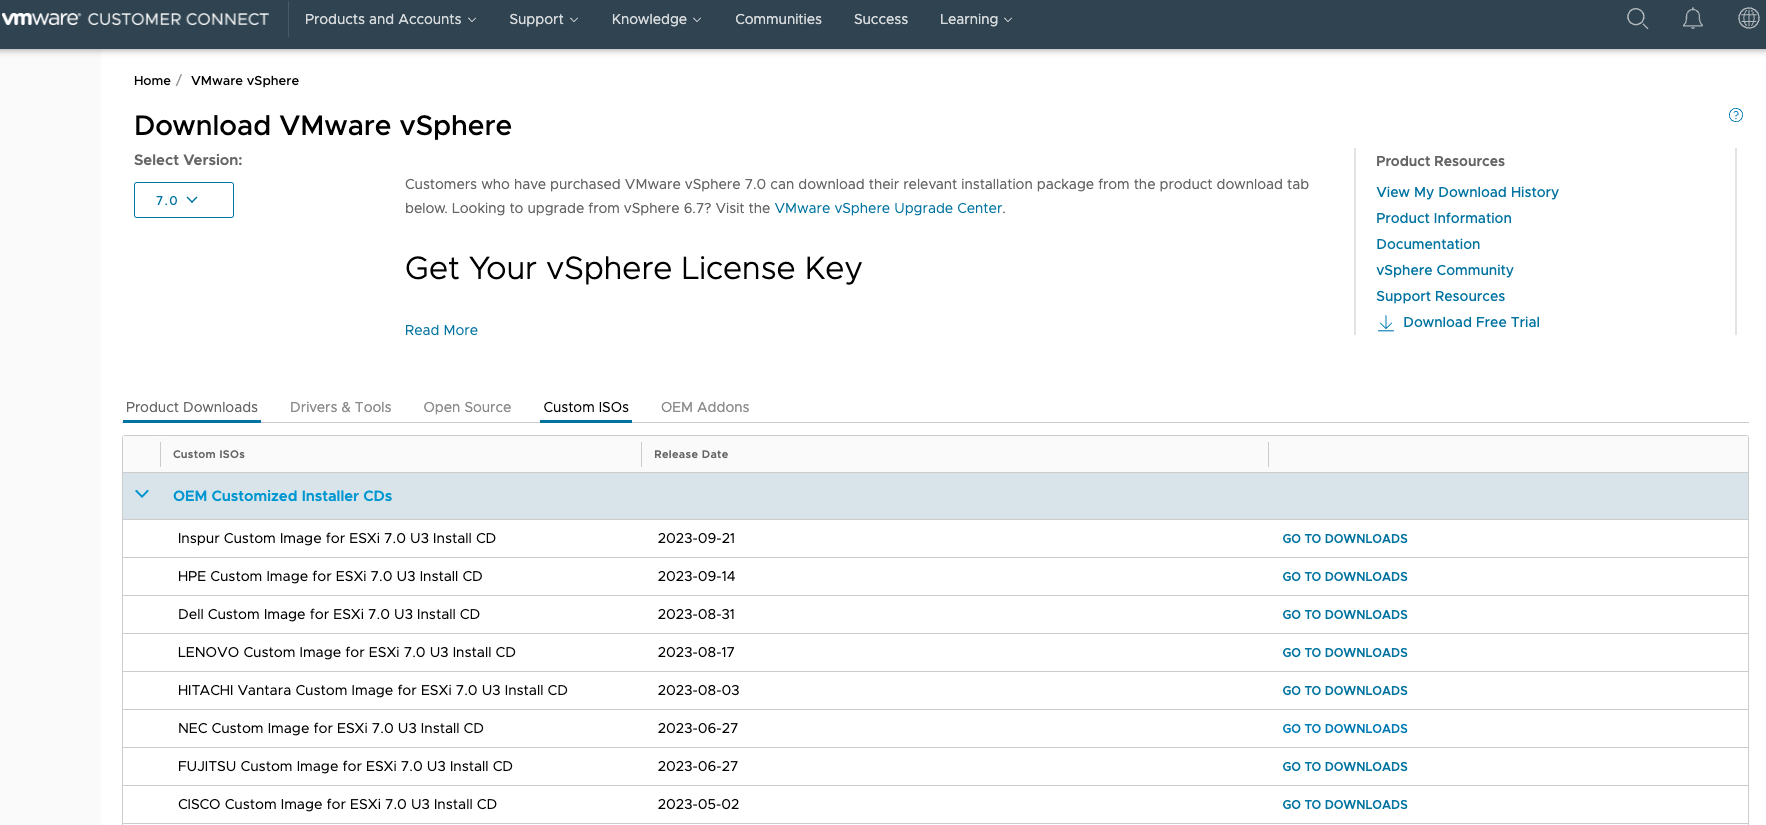
- We are using NEC hosts in the lab, so we will download the [NEC Custom Image for VMware ESXi 6.7 U3 Install CD] file by clicking on [go to downloads] link.
- Download the VMware ESXi 7.0 NEC Custom Image for
VMware ESXi 7.0 U3 Install CD.- Select Version 7.0 from the dropdown menu
- Click Custom ISOs
- Select the NEC Custom Image for ESXi 7.0 U3 Install CD
- Click on the
Go To Downloadslink - We are using NEC hosts in the lab, so we will download the [NEC Custom Image for VMware ESXi 7.0 U3 Install CD] file by clicking on [Download Now] link.
- Download the VMware ESXi 7.0 NEC Custom Image for
VMware ESXi 7.0 U3 Offline Bundle.- Select Version 7.0 from the dropdown menu
- Click Custom ISOs
- Select the NEC Custom Image for ESXi 7.0 U3 Install CD
- Click on the
Go To Downloadslink - We are using NEC hosts in the lab, so we will download the [NEC Custom Image for VMware ESXi 7.0 U3 Offline Bundle] file by clicking on [Download Now] link.
- Navigate to the vCenter web interface https://IPADDRESS & upload the 7.0 offline zip file upgrade to the ESXi host local file system [NAME_OF_FILESYSTEM].
- Click on [Storage/NAME_OF_FILESYSTEM/Datastore browser/Upload]
- Create a new folder named
ESXi7.0_Upgradeon the root of the ESXi hosts file system - Go inside of the
ESXi7.0_Upgradefolder & upload the offline upgrade zip file to the ESXi host - The file location will be
/vmfs/volumes/NAME_OF_FILESYSTEM/ESXi7.0_Upgrade/ESXi-7.0.3-19193900-NEC-GEN-7.0-05.zip - Burn the 6.7 ISO image to a DVD
- Burn the 7.0 ISO image to a DVD
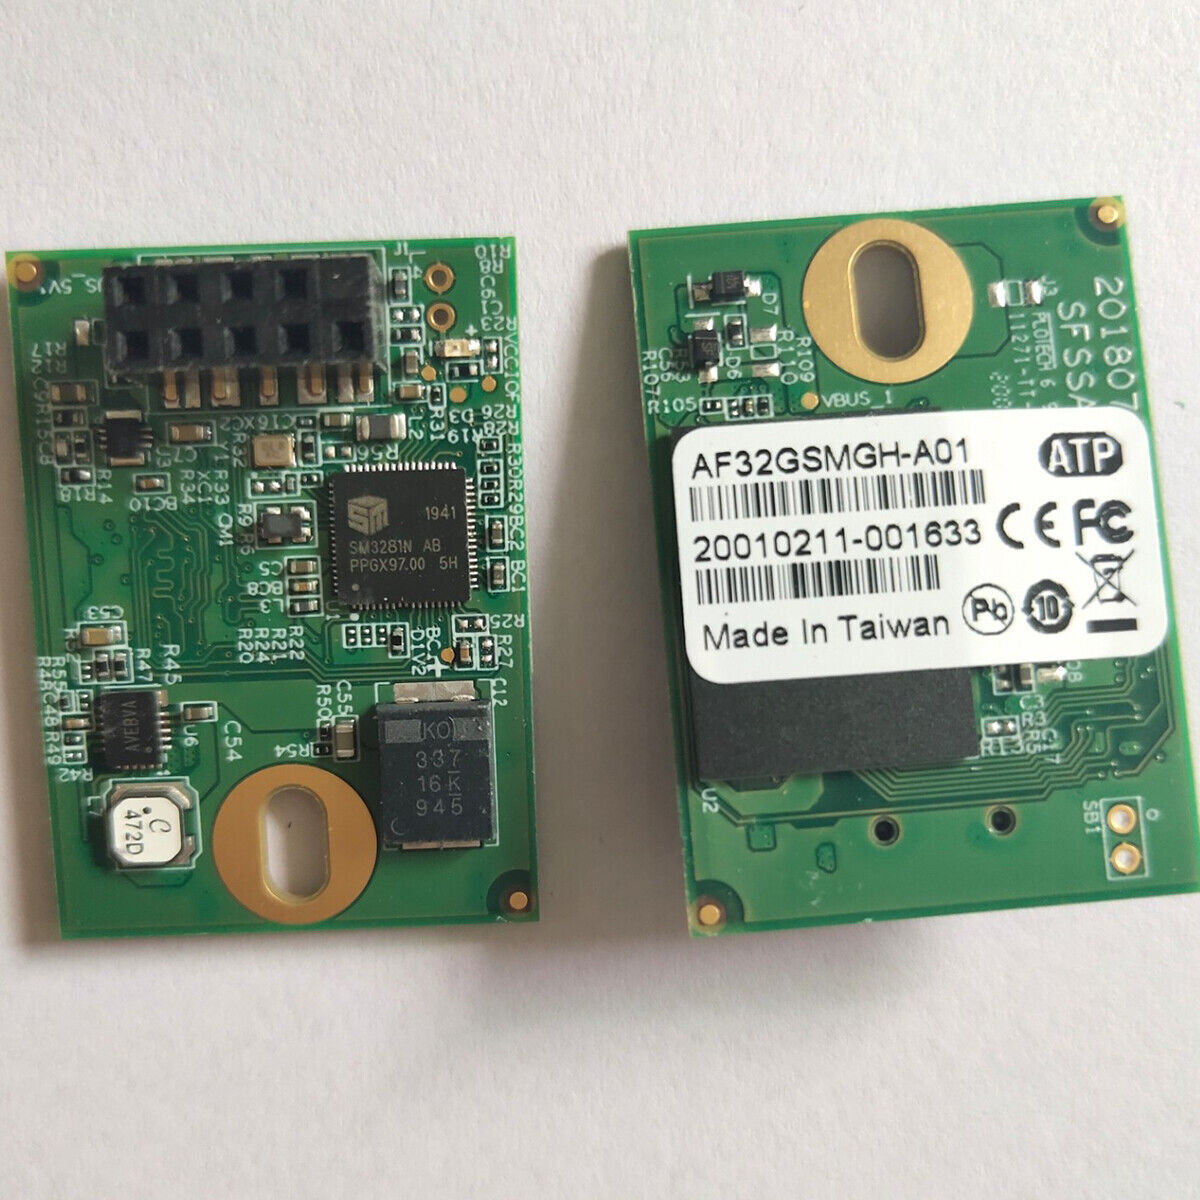
- Remove the server from the rack, remove the old boot drive [USB-DOM 2GB] and install the new boot drive [Intel SSD 200GB]
**Below is what the old boot drive [USB-DOM] looks like.
Install ESXi 6.7
- Insert the VMware ESXi 6.7 installation disk and boot from the disc. Then, VMware ESXi 6.7 Installer starts and reads files from the disk.
- Press [F2] to enter the setup menu
- Press [Enter] at the Welcome screen
- Press [F11] to accept the EULA
- Select the new 200GB SSD to boot from
- Select the keyboard layout to [US default]
- Create and confirm a root password
- Press [F11] to confirm and then allow the installation to begin
- Select Configure Management Network
- Network Adapters
vmnic X - IPv4
- Enable Static IP
- IP Address =
IP ADDRESS - Subnet Mask =
255.255.255.0 - Gateway =
GATEWAY
- DNS
- Primary =
IPADDRESS - Secondary =
IPADDRESS - Hostname =
HOSTNAME
- Primary =
- Custom DNS Suffixes
your.dns.suffix
- Network Adapters
Reboot the server
Restore the configuration file
- Place the ServerX server into maintenance mode
- Log into https://IPADDRESS
- Click on the server/node, then click [Actions/Enter maintenance mode]
- Ensure that your config file backup is named [configBundle.tgz] and copy it to /tmp directory on the ServerX server.
- You my secure copy
scp -rthis file over to the server from another machine on the network. - Run the following command to restore the ESXi configuration
vim-cmd hostsvc/firmware/restore_config 1 /tmp/configBundle.tgz
This restore should be quick, after the restore the server will automatically reboot.
Upgrade the ESXi Host to 7.0
- Confirm that all VMs are still powered off
- SSH into the ESXi host
- Authenticate with root credentials
- Run the following command to confirm which version of ESXi is running
vmware -v
- Navigate to the directory where the upgrade zip file was uploaded
cd /vmfs/volumes/NAME_OF_FILESYSTEM/ESXi7.0_Upgrade- run a
lscommand to confirm that the file is in that location Confirm the profile nameof your upgrade package by running this command:esxcli software sources profile list –d /vmfs/volumes/NAME_OF_FILESYSTEM/ESXi7.0_Upgrade/ ESXi-7.0.3-19193900-NEC-GEN-7.0-05.zip- Execute the following command to
upgrade the ESXi hostusing the profile name you just identified in the previous commandesxcli software profile update –p NEC-addon-GEN_7.0.3-02 –d /vmfs/volumes/NAME_OF_FILESYSTEM/ESXi7.0_Upgrade/ESXi-7.0.3-19193900-NEC-GEN-7.0-05.zip - After successful execution of the command, you will see a long list of updated packages (VIBs) in the console output/ssh session.
- Reboot the ESXi host by executing the following command:
reboot
Confirm the Upgrade to 7.0 U3
- It may take about ~5 minutes for the ESXi host to successfully reboot and come back one with all services available
- Click on the Summary tab in vSphere/vCenter web interface https://IPADDRESS and confirm that the hypervisor version is 7.0 U3
NOTE : I received the error vmware cannot synchronize host disconnected from host. reason: agent upgrade
I received this message because there was a [Task Console] task stuck trying to go into Maintenance Mode. After I canceled that task, I was able to [Right click on the server / Connection/Connect] and I was then able to view this server in vCenter successfully

Serial Number Reconfiguration
- Enter a serial number to activate the vCenter 7 license. License keys from vCenter 6 are not compatible with vCenter 7.
- Log into myvmware.com
- Click on Manage Licenses
- View and take note of the license information for vSphere 7 Enterprise Plus
- Log into vCenter (10.10.254.100)
- Add the new vSphere 7 Enterprise Plus License
- Navigate to Menu/Administration/Licenses/Licenses/Add
- Add the license key ; Next
- Give the license a name ; Next – Example: vSphere 7.0
- Click Finish
*** When upgrading multiple servers, once you enter the vSphere license one time, you will only need to assign the license to each individual server in the future.
- Assign the new vSphere 7 Enterprise Plus License to vc01.your.domain.name
- Navigate to Menu/Administration/Licenses/Assets/Hosts/
- Check the box next to 10.10.254.10X (OR the ESXi host that you need to license) and click the “ASSIGN LICENSE” hyperlink.
- Change the License from the Evaluate License to the vSphere 7.0 license that was previously added.
- Remove the old vSphere 6.x License to avoid and errors/confusion
- Navigate to Menu/Administration/Licenses/Licenses
- Click the checkbox next to the old license, and select Remove
Power on VMs within the ESXi host
- Power on any VMs that you powered off that need to be powered back on
- Click on the ESXi Host; click on the VMs tab; turn on any VM that needs to be on
- Right click on the VM that is off and select Power/Power On.

Server4 (Boot Drive Replacement and vSphere Reconfiguration):
- Ensure that the ESXi configuration has been backed up as detailed in the beginning of this project.
- Remove the server from the rack, remove the old boot drive [USB-DOM 4GB] and install the new boot drive [Intel SSD 200GB]
- Boot from the [NEC Custom Image for VMware ESXi 7.0 U3 Install CD] and begin the ESXi configuration on this new SSD drive. Use one of the black USB 2.0 ports in the back of the NEC server.
Install ESXi 7.0
- Insert the VMware ESXi 7.0 installation disk and boot from the disc. Then, VMware ESXi 7.0 Installer starts and reads files from the disk.
- Press [F2] to enter the setup menu
- Press [Enter] at the Welcome screen
- Press [F11] to accept the EULA
- Select the new 200GB SSD to boot from
- Select the keyboard layout to [US default]
- Create and confirm a root password
- Press [F11] to confirm and then allow the installation to begin
- Select Configure Management Network
- Network Adapters
vmnic X - IPv4
- Enable Static IP
- IP Address =
IP ADDRESS - Subnet Mask =
255.255.255.0 - Gateway =
GATEWAY
- DNS
- Primary =
IPADDRESS - Secondary =
IPADDRESS - Hostname =
HOSTNAME
- Primary =
- Custom DNS Suffixes
your.dns.suffix
- Network Adapters
Reboot the server
Restore the configuration file
- Place the ServerX server into maintenance mode
- Log into https://IPADDRESS
- Click on the server/node, then click [Actions/Enter maintenance mode]
- Ensure that your config file backup is named [configBundle.tgz] and copy it to /tmp directory on the ServerX server.
- You my secure copy
scp -rthis file over to the server from another machine on the network. - Run the following command to restore the ESXi configuration
vim-cmd hostsvc/firmware/restore_config 1 /tmp/configBundle.tgz
This restore should be quick, after the restore the server will automatically reboot.

Power on VMs within the ESXi host
- Power on any VMs that you powered off that need to be powered back on
- Click on the ESXi Host; click on the VMs tab; turn on any VM that needs to be on
- Right click on the VM that is off and select Power/Power On.
Conclusion
The process of upgrading our VMware ESXi hosts from version 6.7 to 7.0 was a substantial undertaking, ensuring the reliability and performance of our virtualization infrastructure. By meticulously planning, executing, and testing each upgrade, we minimized downtime and maintained a robust environment.
Staying up-to-date with the latest ESXi releases is crucial for security, stability, and accessing new features. As we continue, we are well-prepared to leverage the capabilities of VMware ESXi 7.0 to meet the evolving needs of our organization.
📝 For more information about vSphere updates, visit the vSphere Release Notes for vSphere 7.0 3c.